Understanding your capillary fitting: what to look for before you connect
One of the most overlooked factors in maintaining consistent, high-quality spray in nano-scale liquid chromatography is something you handle every time you connect your column: your capillary fitting (Thermo Scientific nanoViper Fingertight Fittings or Waters ZenFit Connection Technology).
The capillary line connects your UHPLC to your column's nanoZero® interface. That connection point is where flow transitions into your column. When the connection is clean, aligned, and properly made, spray current conducts correctly and your spray stays stable. When it isn't, even subtle imperfections can affect the stability of the voltage your column actually experiences, which has a knock-on effect on spray quality, sensitivity, and ultimately, column lifespan.
The good news: a little care and a few simple habits go a long way. Here's what to know.
 This article focuses specifically on spray stability as a starting point. Caring for your capillary fitting also plays a role in achieving sharp peaks and clean chromatography more broadly, which we'll cover in future installments. We'll also cover other factors that contribute to consistent, high-quality spray beyond the fitting itself.
Before you connect: a quick visual check
Every time you connect your nanoViper or equivalent fitting to a nanoZero®, whether that's your analytical column or a trap column, it's worth taking a moment to look at the nose of the fitting before it goes in. What you're looking for is a face that's smooth, flat, and clean. That's your baseline for a good connection. A magnifying glass can help here; the details that matter are small.
Healthy nanoViper seal face; note the smooth, flat, and clean surface and concentric ridges.
Photos shown are of a nanoViper fitting for illustration — the same inspection points apply to other capillary fittings
Alternatively, signs that something may need attention include:
Puckering of the surface
Puckered nanoViper seal face on the right; the central area surrounding the opening protrudes outward, rather than sitting flat as it should. Healthy nanoViper seal face on the left. Photos shown are of a nanoViper fitting for illustration — the same inspection points apply to other capillary fittings
Detached or separated sealing face
Often visible as uneven discolouration across the surface, particularly along the outer rim.
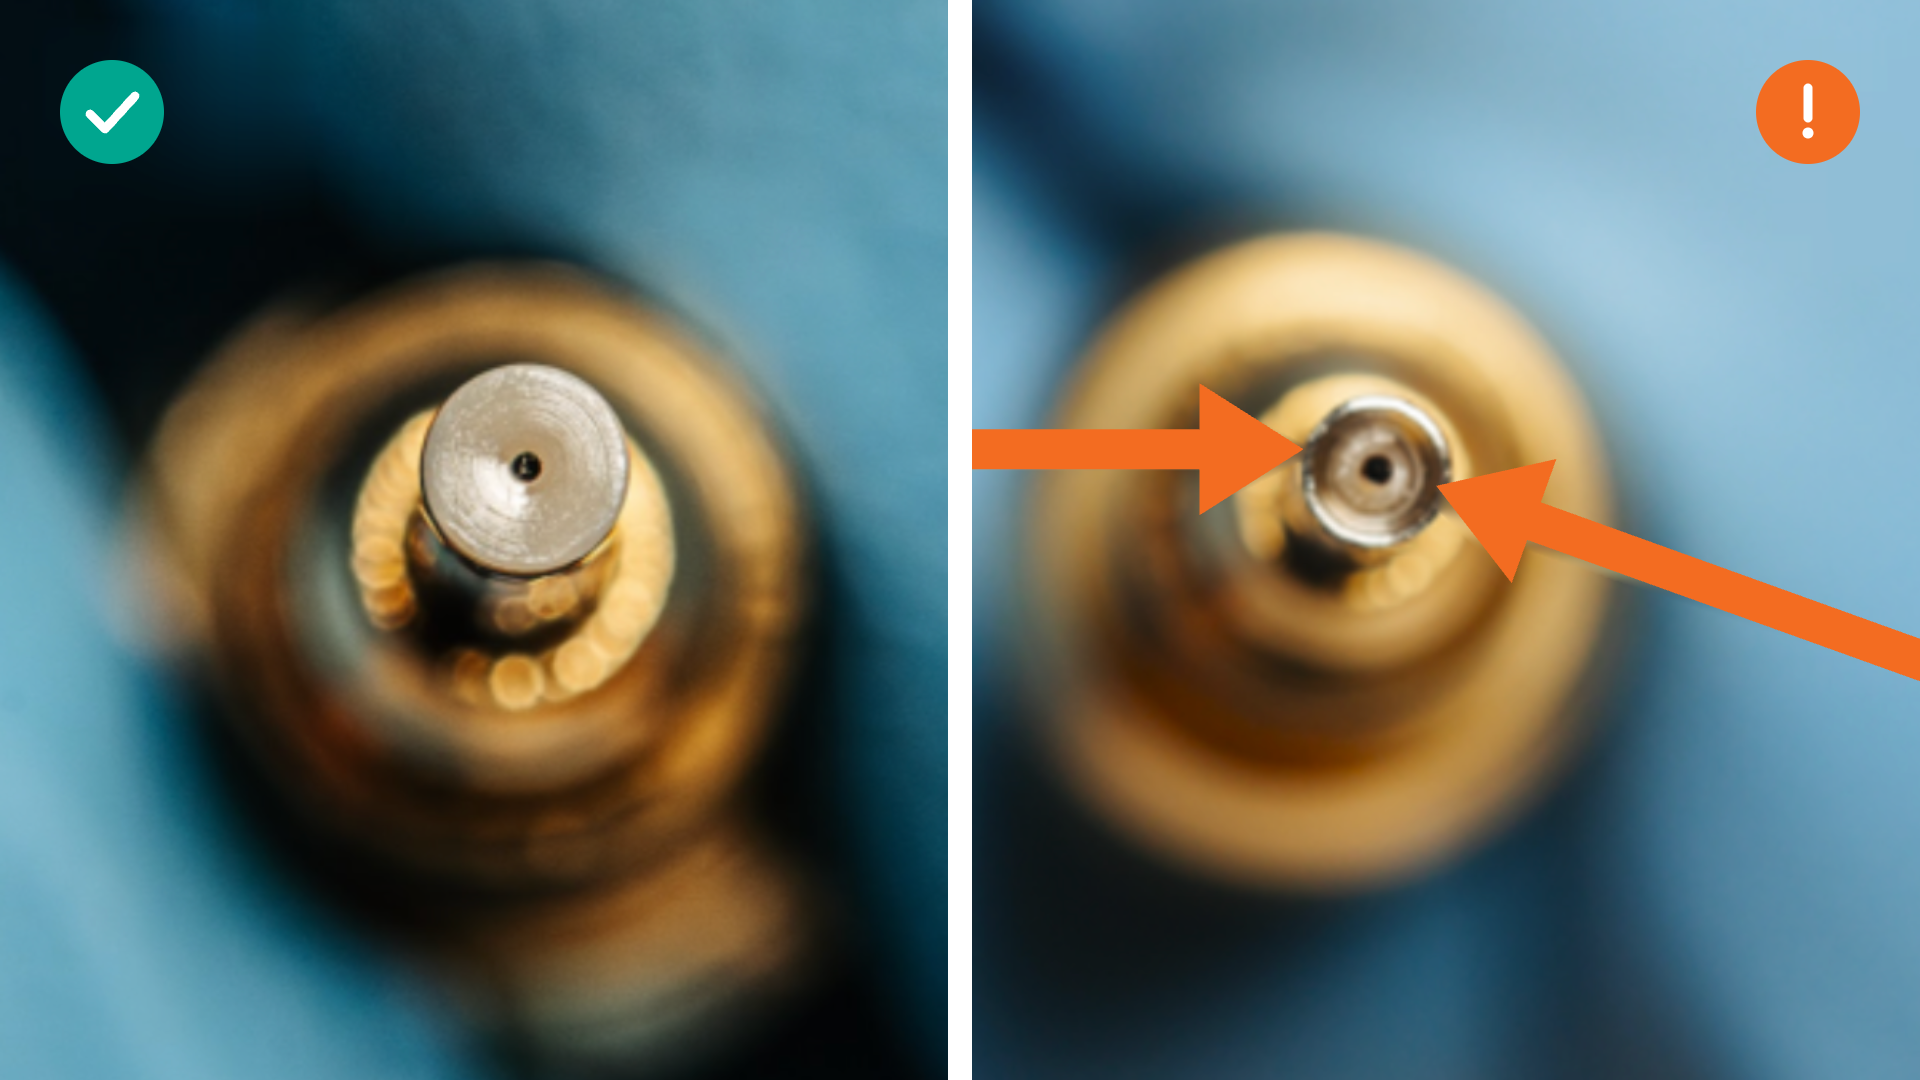
Detached or separated nanoViper sealing face pictured on the right; visible as uneven colouring across the sealing surface, with darkening along the left and right of the outer rim. Healthy nanoViper seal face on the left. Photos shown are of a nanoViper fitting for illustration — the same inspection points apply to other capillary fittings
Detached or separated nanoViper sealing face pictured on the right; visible as uneven colouring across the sealing surface, with darkening along the left and right of the outer rim. Healthy nanoViper seal face on the left. Photos shown are of a nanoViper fitting for illustration — the same inspection points apply to other capillary fittings
Occlusion
Visible buildup of sample residue, salts, or other deposits that could indicate a partial blockage
Partially occluded nanoViper seal face pictured on the right; note the material blocking the central opening. Healthy nanoViper seal face on the left. Photos shown are of a nanoViper fitting for illustration — the same inspection points apply to other capillary fittings
Why does this matter? Any gouging or deformation in the fitting face can compromise the liquid-liquid junction between your capillary fitting and the nanoZero®, potentially creating leaks and introducing dead volume into the flow path. It's easy to miss: some of the leaks can be microscopic and not visible and your flow rate and pressure sensors will likely read as normal. Where it can show up is in flow rate fluctuations, creating a variable signal and, ultimately, in your spray. Users often respond by increasing voltage, not realising the connection is the root cause.
This reflects how precisely Aurora Series® columns are engineered. The emitter geometry of their tips is exceptionally fine, which is what enables true nanospray sensitivity, but it also means the system can amplify subtle junction issues that coarser geometries might mask. In other words, your spray is a genuinely sensitive readout of connection quality.
It’s also worth noting that the nanoZero® is a zero-dead volume connection. This means that the silica capillary of the column is located at the interface between the capillary fittings like the nanoViper or ZenFit and nanoZero®.
Deformation of the non-conductive nose of the capillary fitting can lead to a seal being formed against the column silica capillary. Neither the seal face of the capillary fitting nor the silica capillary is conductive so the result of this seal is that the spray voltage is unable to make contact with the solvent with the result being a loss of spray voltage and electrospray. This is one reason to avoid using a torque tool with your nanoZero®: the combination can cause overtightening and deform the seal face over time (if this has already happened, Step 2 in the troubleshooting section below offers a quick remedy).
It's not only overtightening that poses a risk: as the face of your fittings wears down over time, physical fatigue can have the same effect. The good news: if you inspect before connecting and only make the connection when the face looks good, you're already ahead of most common issues.
For guidance on connecting, removing, and troubleshooting your capillary fitting, see our Help Centre article 'How to connect, remove, and troubleshoot your capillary fitting'.
It's not only overtightening that poses a risk: as the face of your fittings wears down over time, physical fatigue can have the same effect. The good news: if you inspect before connecting and only make the connection when the face looks good, you're already ahead of most common issues.
For guidance on connecting, removing, and troubleshooting your capillary fitting, see our Help Centre article 'How to connect, remove, and troubleshoot your capillary fitting'.